Ben just posted to the LWUIT mailing list about the nuux application entering beta.
Nuux is a nightlife jukebox with social networking features. For more details you can visit nuux.net or try out the application on m.nuux.net.
Monday, December 21, 2009
Tuesday, December 15, 2009
LWUIT 1.3 Released
With great pleasure, the LWUIT team is announcing the GA release of Lightweight UI Toolkit (LWUIT) 1.3.
LWUIT is a UI library that is bundled together with applications and helps content developers create compelling and consistent Java ME applications. LWUIT supports visual components and other UI goodies such as theming, transitions, animation and more.
Key features for the current release:
On a related note, Thorsten just published further detailed instructions for using LWUIT on the blackberry and Android in his website.
LWUIT is a UI library that is bundled together with applications and helps content developers create compelling and consistent Java ME applications. LWUIT supports visual components and other UI goodies such as theming, transitions, animation and more.
Key features for the current release:
- Bidi support (contributed by Telmap) - allows using LWUIT with Right To Left languages such as Arabic, Hebrew
- Lightweight Virtual keyboard support - allowing for customizable touch screen input
- Pixel based scrolling - allowing scroll to work as expected even when components/containers exceed screen bounds and not just for focusable components
- Table layout and table component - allowing complex tabular UI's including support for features such as spanning rows/columns
- Tree component - supporting nested elements and expanding
- Spinner component for date, time and numeric input within a range
- Reimplementation of the ComboBox widget
- SVG Support integrated into the Theme Creator (formerly LWUIT Designer/Resource Editor)
- Touch device improvements: button menus, improved kinetic scrolling, tactile touch (vibration on touch)
- Resource file specification
- Redesigned the list renderer "rendering" logic so that it paints the backgrounds of the renderers first, and then the selection and foreground.
On a related note, Thorsten just published further detailed instructions for using LWUIT on the blackberry and Android in his website.
Tuesday, December 8, 2009
Spinning It Round And Round
Spinner is a component we have been postponing since before the 1.0 release of LWUIT, this delay has finally come to an end with the new release of the Spinner component into SVN joining the Tree/Table who are all major features for the 1.3 release.
The Spinner is mostly interesting because it is a composite component that mashes together a list and a text field to create a very unique input method that has some of both. It allows users to select from what is possibly a huge list (not infinite but still pretty huge), of numbers, dates or times. It allows users to type parts of the values or the entire values into the UI for fast searches within the list similar to the searchable list I recently blogged about.
The Spinner achieves such huge lists by creating its own ListModel and using a formula to calculate values on the fly, a renderer is used to display the list as a user would expect it to appear (date/time). The text field is painted in the appropriate location for the date/time input and its values are directly parsed into place.
The source code of the Spinner can be a great starting place to understand how to deeply manipulate such LWUIT components.
The video to the right was created with the four basic spinners. Notice that a spinner normally accepts min, max, current and step size values. For date these are in milliseconds since epoc and for time it it in seconds since midnight.
Form form = new Form("Spinners");
Spinner integerSpinner = Spinner.create(0, 1000, 100, 10);
Spinner decimalSpinner = Spinner.create(0.0, 100.0, 17.75, 0.05);
Spinner timeSpinner = Spinner.createTime(0, 24 * 60 * 60, 10 * 60 * 60, 60, true, false);
Spinner dateSpinner = Spinner.createDate(System.currentTimeMillis() - 1000 * DAY,
       System.currentTimeMillis() + 1000 * DAY, System.currentTimeMillis(),
       '-', Spinner.DATE_FORMAT_MM_DD_YYYY);

form.setLayout(new TableLayout(4, 2));
form.addComponent(new Label("Integer"));
form.addComponent(integerSpinner);
form.addComponent(new Label("Decimal"));
form.addComponent(decimalSpinner);
form.addComponent(new Label("Time"));
form.addComponent(timeSpinner);
form.addComponent(new Label("Date"));
form.addComponent(dateSpinner);
form.show();
Wednesday, November 25, 2009
Ni Hao LWUIT: Chinese Blog By Max Mu
Max Mu who you might recall as the developer who ported Sun's open source Phone ME VM to the PSP, has started a LWUIT blog in Chinese.
Chinese speakers should definitely check it out!
Chinese speakers should definitely check it out!
Tuesday, November 24, 2009
Building A Project On The BlackBerry
 Update 2: The Netbeans link within the body died a while back. Updated instructions for 6.7 and newer are available here.
Updated: I forgot to add the main method and UiApplication section. It is now part 9 of the instructions.
While Thorsten & myself wrote build instructions for the BlackBerry in the forum/mailing list in the past they are somewhat outdated by now and aren't as easy to find using Google. So here is a step by step guide on porting to the BlackBerry devices with some explanations of the Caveats.
The standard LWUIT won't work on the Blackberry since it references API's such as 184/226, notice that LWUIT doesn't need or use these API's when they are not available! On the Blackberry device the very reference to these API's will cause the application to fail. Furthermore, as I explained in a previous post, Blackberry devices have some "issues" when using classes compiled without the RIM toolchain and LWUIT isn't compiled with the RIM toolchain.
Last but not least, the performance and user experience of the MIDP based LWUIT on Blackberry isn't very good...
The solution for all these issues is to use the RIM API's, which unfortunately means you need to create two separate versions of your application (3 if you need blackberry Storm support) .
I won't go into too many details on the BlackBerry devices, but a couple of years ago they introduced the Storm device which was their first touch screen device (featuring a click screen). Supporting the Storm requires importing classes of the API that aren't supported in older versions of RIM's API, hence Storm compatibility requires using a relatively new BlackBerry OS that most users don't have.
So you will need two builds and two blackberry Java Development Environments (JDE's) if you need to support Storm.
The instructions bellow are also geared towards the NetBeans IDE and Ant build.
LWUIT currently has two maintained BlackBerry ports, one created by Thorsten & another created by myself. Each has its advantages and you can easily go back and forth between them. Since I used NetBeans I will explain based on my port but you can easily replace the content of the src directory with Thorsten's port and it should be pretty seamless.
 A standard LWUIT MIDlet should work fine on a RIM device using the ports, however RIM also offers support for a CLDC application. Using this approach tends to provide improved performance/security handling for RIM although its completely optional.
- Download the JDE versions, I recommend 4.2.x and 4.7.x (for Storm support).
- Follow the NetBeans BlackBerry knowledge base article to add the JDE versions as platforms to NetBeans (no need to follow the part about editing the build.xml).
- Fetch the LWUIT sources from SVN and open the BlackBerry project. Clean & Build the project (notice that you MUST clean & build, a plain build will often fail since the RIM port needs to replace some classes from LWUIT).
- If using storm as well, change the configuration of the Blackberry LWUIT port to "touch" and again clean & build.
- Download the BB ant tasks which are much easier to work with than the approach taken by the knowledge base article.
- Add "configurations" to the NetBeans project for BlackBerry and BlackBerryTouch. Set them to use the appropriate JDE Platforms.
- In the blackberry configurations add an "Ability" called RIM. This will allow you to use #ifdef RIM
rather than #ifdef BlackBerryTouch && BlackBerry
(yes, I can't stand #ifdef's but they are better than just copy and pasting the entire code and with RIM we don't have a choice). - In the libraries for the project add both LWUIT & the appropriate blackberry project. Make sure to add the touch JAR only to the touch (Storm) configuration and the standard jar to the other BlackBerry configuration.
- If you are building a CLDC UiApplication add the following to your MIDlet class definition (instead of extends MIDlet):
public MyMIDlet extends //#ifdef RIM
net.rim.device.api.ui.UiApplication
//#else
//# javax.microedition.midlet.MIDlet
//#endif
{
Then add this to the body of the MIDlet:
//#ifdef Blackberry
public static void main(String[] argv) {
new MyMIDlet().startApp();
}
//#endif
You might want to also add similar methods for notifyDestroyed/platformRequest:
public void notifyDestroyed() {
System.exit(0);
}
public void platformRequest(String s) {
net.rim.blackberry.api.browser.Browser.getDefaultSession().displayPage(s);
} - Open the build.xml file of your NetBeans project and add the following, update the paths and names marked in bold (notice this is geared towards a CLDC UiApplication, you might need to modify this slightly for a MIDlet):
<target name="post-init">
<available file="${platform.home}/bin/rapc.exe" property="do.rapc">
<available file="${platform.home}/simulator/9500.bat" property="bbtouch">
<condition property="jpda.port" value="8000">
<isset property="do.rapc">
</isset>
</condition>
<target name="post-preprocess" depends="copyBBSources,copyBBTouchSources">
</target>
<typedef resource="bb-ant-defs.xml" classpath="bb-ant-tools.jar">
<target name="bbbuild" description="blackberry build" depends="init,copyBBSources,copyBBTouchSources">
<echo message="Compiling ${preprocessed.dir}"></echo>
<mkdir dir="${dist.dir}/bbant">
<rapc verbose="true" output="${name}" jdehome="${platform.home}" import="${platform.bootclasspath}" destdir="${dist.dir}/bbant/" noconvert="true">
<src location="${basedir}/${preprocessed.dir}">
<jdp title="Vendor" version="1" type="cldc" icon="${basedir}/src/icon.png" />
</jdp>
<!-- sigtool jdehome="C:\Program Files\Research In Motion\BlackBerry JDE 4.7.0" codfile="${dist.dir}/bbant/${name}.cod" password="" / -->
<alx destdir="${dist.dir}/bbant" filename="${name}.alx">
<application id="AppName">
<codset>
<fileset dir="${dist.dir}/bbant" includes="*.cod">
</fileset>
</codset>
</application>
<mkdir dir="${dist.dir}/bbant-final">
<jadtool description="desc" id="appId" input="${dist.dir}/${dist.jad}" destdir="${dist.dir}/bbant-final">
<fileset dir="${dist.dir}/bbant" includes="*.cod">
</fileset>
</jadtool>
<target name="copyBBTouchSources" if="bbtouch">
<echo message="Copying blackberry touch sources"></echo>
<copydir forceoverwrite="true" src="$%7Bproject.BlackberryPort%7D%5Cbuild%5Ctouch%5Cpreprocessed" dest="${basedir}/${preprocessed.dir}">
<touch file="${basedir}/${preprocessed.dir}/com/sun/lwuit/M3G.java">
<touch file="${basedir}/${preprocessed.dir}/com/sun/lwuit/SVGImage.java">
<touch file="${basedir}/${preprocessed.dir}/com/sun/lwuit/animations/Transition3D.java">
<touch file="${basedir}/${preprocessed.dir}/com/sun/lwuit/impl/midp/SVGImplementation.java">
</touch>
<target name="copyBBSources" if="do.rapc">
<echo message="Copying blackberry sources ${preprocessed.dir}"></echo>
<copydir src="$%7Bproject.LWUIT%7D%5Csrc" dest="${basedir}/${preprocessed.dir}">
<copydir forceoverwrite="true" src="$%7Bproject.BlackberryPort%7D%5Cbuild%5Cpreprocessed" dest="${basedir}/${preprocessed.dir}">
<touch file="${basedir}/${preprocessed.dir}/com/sun/lwuit/M3G.java">
<touch file="${basedir}/${preprocessed.dir}/com/sun/lwuit/SVGImage.java">
<touch file="${basedir}/${preprocessed.dir}/com/sun/lwuit/animations/Transition3D.java">
<touch file="${basedir}/${preprocessed.dir}/com/sun/lwuit/impl/midp/SVGImplementation.java">
</touch>
<target name="post-jar" if="do.rapc">
<rapc verbose="true" output="${name}" jdehome="${platform.home}" import="${platform.bootclasspath}" destdir="${platform.home}/simulator/" noconvert="true">
<src location="${basedir}/${preprocessed.dir}">
<jdp title="Vendor" version="1" type="cldc" icon="${basedir}/src/icon.png" />
</jdp>
</src>
<target name="post-clean">
<delete failonerror="false">
<fileset dir="${platform.home}/simulator">
<include name="**/${name}.*">
</include>
</fileset>
</delete>
</target>
Monday, November 16, 2009
Rounded Fading Galore
The look of some modern phones is wasteful in screen real-estate but stunning in visual effect. The rounded UI and faded scrolling are are gorgeous effects on newer devices that make a huge difference with very little work.
These effect can be added to LWUIT easily without overhauling anything. I neglected to add padding to the softbutton area in the demo code but other than that the code is trivial. I used a glass pane for the rounded border effect, you can use hardcoded image files to provide proper anti-aliasing.
The fade effect required gradient image masks and replacing the look and feel which in itself wasn't too difficult either.
BTW I very much enjoyed reading Angelo's post on gradients, this is something that our UI designer has been riding on me to get for a very long time... I'm still trying to figure out a way to integrate this into the whole designer/style paradigm in an easy to use way...
/**
* Allows overriding the form to give it a "rounded border" look and feel
* with a fade out in the bottom in case of scrolling.
*
* @author Shai Almog
*/
public class RoundFadeGlassPane implements Painter {
   private Image topLeft;
   private Image topRight;
   private Image bottomLeft;
   private Image bottomRight;
   private Form parentForm;

   public RoundFadeGlassPane(Form f) {
       parentForm = f;
       Image blackCorner = Image.createImage(60, 60);

       Graphics cornersGraphics = blackCorner.getGraphics();
       cornersGraphics.setColor(0);
       cornersGraphics.fillRect(0, 0, blackCorner.getWidth(), blackCorner.getHeight());
       cornersGraphics.setColor(0xffffff);
       cornersGraphics.fillRoundRect(0, 0, 200, 200, 60, 60);

       // get the white color since it might be modified when rendering and might not actually be 0xffffff
       // e.g. it might be 0xfefefe due to rendering issues
       int white = blackCorner.getRGBCached()[blackCorner.getHeight() / 2 * blackCorner.getWidth()];

       // remove the white color from the image so only the black corners remain
       blackCorner = blackCorner.modifyAlpha((byte)0xff, white);

       topLeft = blackCorner;
       topRight = topLeft.rotate(90);
       bottomRight = topLeft.rotate(180);
       bottomLeft = topLeft.rotate(270);
       PainterChain.installGlassPane(f, this);
   }

   public void paint(Graphics g, Rectangle rect) {
       g.drawImage(topLeft, 0, 0);
       g.drawImage(topRight, parentForm.getWidth() - topRight.getWidth(), 0);
       g.drawImage(bottomLeft, 0, parentForm.getHeight() - bottomRight.getHeight());
       g.drawImage(bottomRight, parentForm.getWidth() - topRight.getWidth(), parentForm.getHeight() - bottomRight.getHeight());
   }
}
/**
* Simple look and feel automatically installing the "round look" for applications
*
* @author Shai Almog
*/
public class RoundFadeLookAndFeel extends DefaultLookAndFeel {
   private Object topMask;
   private Object bottomMask;
   private Image topCache;
   private Image bottomCache;

   public void bind(Component c) {
       if(c instanceof Form) {
           new RoundFadeGlassPane((Form)c);
       }
   }

   private Object createFadeMask(boolean direction) {
       Image mask = Image.createImage(Display.getInstance().getDisplayWidth(), Display.getInstance().getDisplayHeight() / 10);
       Graphics g = mask.getGraphics();
       g.setColor(0xffffff);
       g.fillRect(0, 0, mask.getWidth(), mask.getHeight());
       if(direction) {
           g.fillLinearGradient(0, 0xffffff, 0, -5,
                     mask.getWidth(), mask.getHeight(), false);
       } else {
           g.fillLinearGradient(0xffffff, 0, 0, 5,
                     mask.getWidth(), mask.getHeight(), false);
       }
       return mask.createMask();
   }

   private Object getTopMask() {
       if(topCache == null || topCache.getWidth() !=
                Display.getInstance().getDisplayWidth()) {
           topMask = createFadeMask(false);
           topCache = Image.createImage(
               Display.getInstance().getDisplayWidth(),
               Display.getInstance().getDisplayHeight() / 10);
       }
       return topMask;
   }

   private Object getBottomMask() {
       if(bottomCache == null || bottomCache.getWidth() !=
               Display.getInstance().getDisplayWidth()) {
           bottomMask = createFadeMask(true);
           bottomCache = Image.createImage(
                 Display.getInstance().getDisplayWidth(),
                 Display.getInstance().getDisplayHeight() / 10);
       }
       return bottomMask;
   }

   public void drawVerticalScroll(Graphics g, Component c,
            float offsetRatio, float blockSizeRatio) {
       if(offsetRatio + blockSizeRatio < 0.995) {
           // we need to draw the fade on the bottom
           Object bottom = getBottomMask();
           Graphics temp = bottomCache.getGraphics();
           temp.translate(0, bottomCache.getHeight() - c.getHeight());
           c.paintBackgrounds(temp);
           g.drawImage(bottomCache.applyMask(bottom), c.getX(), c.getY() + c.getHeight() - bottomCache.getHeight());
       }
       if(offsetRatio > 0) {
           // we need to draw the fade on the top
           Object top = getTopMask();
           Graphics temp = topCache.getGraphics();
           temp.translate(0, topCache.getHeight() - c.getHeight());
           c.paintBackgrounds(temp);
           g.drawImage(topCache.applyMask(top), c.getX(), c.getY());
       }
       super.drawVerticalScroll(g, c, offsetRatio, blockSizeRatio);
   }
}
Tuesday, November 3, 2009
Optimized For The Touch
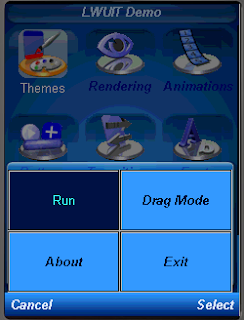 The LWUIT developer guide generally recommends increasing the padding of components to make them "finger friendly" as a generic guide for LWUIT on touch devices. While this is true, its somewhat basic and we can do much more in LWUIT and outside of it to make our application easier for the touch...
Two of the newer features in LWUIT's SVN are touch menus and tactile feedback, both are off by default and should be explicitly activated. The reason for this is that we don't want to "enforce" our opinion on how touch should look/feel on an application.
You can query whether the device supports touch by invoking Display.getInstance().isTouchScreenDevice()
Notice that the isTouchScreenDevice() method doesn't work properly on some simulators... However, it seems to work reasonably well on the actual devices.
To enable touch menus just use:
UIManager.getInstance().getLookAndFeel().setTouchMenus(true);
You can customize the look of the buttons via the "TouchCommand" selector in the theme.
The tactile feedback causes the phone to vibrate when the user presses a component that is intractable (e.g. list/button). Since most touch screens aren't of very good quality this is very useful in giving the user a sense that the screen actually registered his interaction. To enable this you can use:
UIManager.getInstance().getLookAndFeel().setTactileTouchDuration(100);
The argument is the number of milliseconds to vibrate on touch 50 to 100 seem like reasonable numbers, 0 disables the feature.
Component now has isTactileTouch()/setTactileTouch(boolean) methods to toggle the tactile touch vibration per a specific component. By default LWUIT tries to initialize this based on focusability so for custom components it might be useful to manipulate this flag.
A somewhat older flag which we would recommend is fireOnClick() for Lists. By default lists require two clicks to activate an entry, the first selects the entry and the second opens it.
This allows "context command flow", e.g. a command such as "remove" that removes the current selected entry. However, on touch devices this sort of behavior is often inconvenient and you would expect the "remove" command to move you to a separate list of checkboxes to select the entries to remove.
You would normally expect a single tap on the entry to act like the fire key (send an action event immediately) and not like simple selection. Calling List.fireOnClick(true) makes the list behave like that which is more convenient for touch device, however you need to ensure your application flow can handle this.
There is also the virtual keyboard that Chen blogged about recently, this is immensely useful for touch and Chen has improved its performance considerably!
As a side note unrelated to LWUIT, many devices have a "compatibility" mode on by default where keys are placed by the device at the bottom of the touch screen to allow "none-touch" Java ME applications to run on the device. Applications are expected to explicitly declare their support for touch to utilize the full screen of the device. This is done using the following Jad flags:
Navi-Key-Hidden: true
Nokia-MIDlet-On-Screen-Keypad: no
MIDlet-Touch-Support: true
Notice that the last entry (MIDlet-Touch-Support) is required by current/older Samsung/LG devices but is illegal by the MIDP specification hence fails on Nokia etc. so for support on these devices you would need a copy of your JAD (only the jad) with this attribute added.
Update: LG have added another JAD attribute required to hide the native vkb which you should probably add to all applications:
LGE-MIDlet-Display-Nav-Keypad: no
Sunday, October 25, 2009
BiDi & Oh So Many Changes!
Bidi has finally landed after quite a wait this effort was contributed by Telmap and implemented mostly by Ofir Leitner.
Besides bidi Chen and myself committed allot of groundbreaking changes. Chen made some very significant performance improvements for LWUIT very noticeable in the Virtual Keyboard code. I committed more elaborate Scrollbar styling code, we now also have HorizontalScroll and can generally customize all aspects of a scroll/scroll thumb using the theme rather than using the old approach of look & feel override.
But the meat and potatoes of the commit is the bidi code... BiDi is the term refering to Bi-directional language support, generally RTL languages. There is plenty of information about RTL languages (Arabic, Hebrew, Syriac, Thaana) on the internet but as a brief primer here is a minor summary.
Most western languages are written from left to right (LTR), however some languages are normally written from right to left (RTL) speakers of these languages expect the UI to flow in the opposite direction otherwise it seems weird just like reading this word would be to most English speakers: "drieW".
The problem posed by RTL languages is known as BiDi (Bi-directional) and not as RTL since the "true" problem isn't the reversal of the writing/UI but rather the mixing of RTL and LTR together. E.g. numbers are always written from left to right (just like in English) so in an RTL language the direction is from right to left and once we reach a number or English text embedded in the middle of the sentence (such as a name) the direction switches for a duration and is later restored.
LWUIT's support for bidi includes the following components:
Most of LWUIT's RTL support is under the hood, the LookAndFeel global RTL flag can be enabled using:
UIManager.getInstance().getLookAndFeel().setRTL(true);
(Notice that setting the RTL to true implicitly activates the bidi algorithm).
Once RTL is activated all positions in LWUIT become reversed and the UI becomes a mirror of itself. E.g. A softkey placed on the left moves to the right, padding on the left becomes padding on the right, the scroll moves to the left etc.
This applies to the layout managers (except for group layout) and most components. Bidi is mostly seamless in LWUIT but a developer still needs to be aware that his UI might be mirrored for these cases.
Besides bidi Chen and myself committed allot of groundbreaking changes. Chen made some very significant performance improvements for LWUIT very noticeable in the Virtual Keyboard code. I committed more elaborate Scrollbar styling code, we now also have HorizontalScroll and can generally customize all aspects of a scroll/scroll thumb using the theme rather than using the old approach of look & feel override.
But the meat and potatoes of the commit is the bidi code... BiDi is the term refering to Bi-directional language support, generally RTL languages. There is plenty of information about RTL languages (Arabic, Hebrew, Syriac, Thaana) on the internet but as a brief primer here is a minor summary.
Most western languages are written from left to right (LTR), however some languages are normally written from right to left (RTL) speakers of these languages expect the UI to flow in the opposite direction otherwise it seems weird just like reading this word would be to most English speakers: "drieW".
The problem posed by RTL languages is known as BiDi (Bi-directional) and not as RTL since the "true" problem isn't the reversal of the writing/UI but rather the mixing of RTL and LTR together. E.g. numbers are always written from left to right (just like in English) so in an RTL language the direction is from right to left and once we reach a number or English text embedded in the middle of the sentence (such as a name) the direction switches for a duration and is later restored.
LWUIT's support for bidi includes the following components:
- Bidi algorithm - allows converting between logical to visual representation for rendering
- Globabl RTL flag - default flag for the entire application indicating the UI should flow from right to left
- Individual RTL flag - flag indicating that the specific component/container should be presented as an RTL/LTR component (e.g. for displaying English elements within a RTL UI).
- RTL text field input
- RTL bitmap font rendering
Most of LWUIT's RTL support is under the hood, the LookAndFeel global RTL flag can be enabled using:
UIManager.getInstance().getLookAndFeel().setRTL(true);
(Notice that setting the RTL to true implicitly activates the bidi algorithm).
Once RTL is activated all positions in LWUIT become reversed and the UI becomes a mirror of itself. E.g. A softkey placed on the left moves to the right, padding on the left becomes padding on the right, the scroll moves to the left etc.
This applies to the layout managers (except for group layout) and most components. Bidi is mostly seamless in LWUIT but a developer still needs to be aware that his UI might be mirrored for these cases.
Tuesday, October 20, 2009
Arrange It Like A Table, Introducing The Table Layout
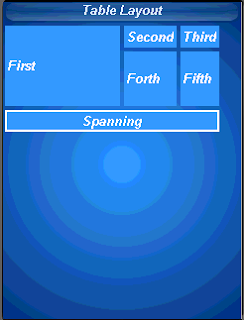 In a recent post I discussed LWUIT 1.3's upcoming table component. This new component is based on a new underlying layout manager also introduced in LWUIT 1.3: the table layout.
The table layout is largely inspired by the HTML table tag and slightly by AWT's GridBagLayout.
The table layout is a constraint based layout (similar to the border layout) this means that unlike other layout managers that expect components to be added on their own:
container.addComponent(component);
The table layout container expects something like this:
container.addComponent(tableConstraint, component);
Notice that this syntax is optional if omitting the constraint a default behavior will ensue of placing the component in the next available cell.
The table layout will automatically size components to the largest preferred size in the row/column until running out of space, if the table is not horizontally scrollable this will happen when the edge of the parent container is reached (close to the edge of the screen) and further components will be "crammed together". Notice that all cells in the table layout are sized to fit the entire cell always. To align, or margin cell's a developer can use the methods of the component/Style appropriately.
A developer can provide hints to the table layout to enable spanning and more detailed column/row sizes using the constraint argument to the addComponent method. The constraint argument is an instance of TableLayout.Constraint that must not be reused for more than one cell, this will cause an exception.
A constraint can specify the absolute row/column where the entry should fit as well as spanning between cell boundaries. Notice that in the picture the "First" cell is spanned vertically while the "Spanning" cell is spanned horizontally. This is immensely useful in creating elaborate UI's,
Constraints can also specify a height/width for a column/row that will override the default, this size is indicated in percentage of the total table layout size. In the picture you can see that the "First" label is sized to 50% width while the "Forth" label is sized to 20% height.
Form mainForm = new Form("Table Layout");
TableLayout layout = new TableLayout(4, 3);
mainForm.setLayout(layout);
TableLayout.Constraint constraint = layout.createConstraint();
constraint.setVerticalSpan(2);
constraint.setWidthPercentage(50);
mainForm.addComponent(constraint, new Label("First"));
mainForm.addComponent(new Label("Second"));
mainForm.addComponent(new Label("Third"));

constraint = layout.createConstraint();
constraint.setHeightPercentage(20);
mainForm.addComponent(constraint, new Label("Forth"));
mainForm.addComponent(new Label("Fifth"));
constraint = layout.createConstraint();
constraint.setHorizontalSpan(3);
Label span = new Label("Spanning");
span.getStyle().setBorder(Border.createLineBorder(2));
span.setAlignment(Component.CENTER);
mainForm.addComponent(constraint, span);
mainForm.show();
Wednesday, October 14, 2009
Tickering Everywhere
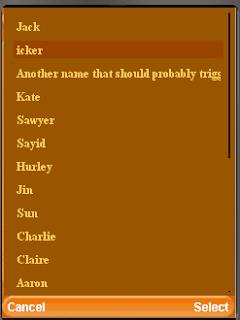 Its been a while since my original LWUIT ticker list post and quite a few has changed, back when I originally posted there was no built in tickering functionality in LWUIT itself. Recent questions in the mailing list and from partners prompted me to write the code bellow, generally for tickering a ComboBox however I tried to make it as generic as possible so it can be installed into every list out there.
Notice that to ticker custom components you need to set them as a cell renderer to prevent the label from throwing an exception when invoking startTicker. You can use the TickerRenderer bellow with practically every list and it doesn't need to be a part of a combo box.
public class TickerComboDemo extends MIDlet {
  public void startApp() {
      try {
          Display.init(this);
          Resources r = Resources.open("/javaTheme.res");
          UIManager.getInstance().setThemeProps(r.getTheme(r.getThemeResourceNames()[0]));
          Form form = new Form("Ticker Combo");
          ComboBox combo = new ComboBox(new String[]{"Jack",
                  "Name that should probably trigger a ticker",
                "Another name that should probably trigger a ticker",
                "Kate", "Sawyer", "Sayid", "Hurley", "Jin", "Sun", "Charlie", "Claire",
                "Aaron", "Michael", "Walt", "Boone", "Shannon", "Locke", "Mr. Eko",
                "Ana-Lucia", "Libby", "Desmond", "Benjamin Linus", "Juliet Burke"}) {
              protected List createPopupList() {
                  List l = super.createPopupList();
                  l.setListCellRenderer(new TickerRenderer());
                  return l;
              }
          };
          form.addComponent(combo);
          form.show();
      } catch (IOException ex) {
          ex.printStackTrace();
      }
  }

  class TickerRenderer extends DefaultListCellRenderer {
      private DefaultListCellRenderer selectedRenderer = new DefaultListCellRenderer(false);
      private List parentList;
      public TickerRenderer() {
          super(false);
      }

      public boolean animate() {
          if(parentList != null && parentList.getComponentForm() != null) {
              if(selectedRenderer.isTickerRunning()) {
                  if(selectedRenderer.animate()) {
                      parentList.repaint();
                  }
              }
          }
          return super.animate();
      }

      public Component getListCellRendererComponent(List list, Object value, int index, boolean isSelected) {
          if(isSelected) {
              selectedRenderer.getListCellRendererComponent(list, value, index, isSelected);

              // sometimes the list asks for a dummy selected value for size calculations and this might
              // break the tickering state
              if(index == list.getSelectedIndex()) {
                  if(selectedRenderer.shouldTickerStart()) {
                      if(!selectedRenderer.isTickerRunning()) {
                          parentList = list;
                          list.getComponentForm().registerAnimated(this);
                          selectedRenderer.startTicker(UIManager.getInstance().getLookAndFeel().getTickerSpeed(), true);
                      }
                  } else {
                      if(selectedRenderer.isTickerRunning()) {
                          selectedRenderer.stopTicker();
                      }
                  }
              }
              return selectedRenderer;
          } else {
              return super.getListCellRendererComponent(list, value, index, isSelected);
          }
      }
  }

  public void pauseApp() {
  }

  public void destroyApp(boolean unconditional) {
  }
}
Monday, October 12, 2009
LWUIT Binaries Are Now At java.sun.com Only
 Our binaries are no longer hosted on java.net to avoid confusion between the binary drops and the source version. All of LWUIT binary elements are now a part of the new LWUIT product page at java.sun.com.
The java.net project home page and forum are still the development hub for discussion and ongoing development.
Thursday, October 8, 2009
Coordinating That Layout
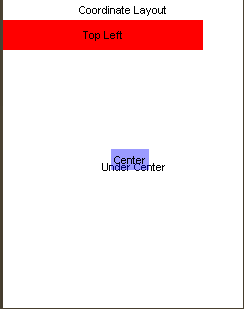 Chen & myself are huge advocates of placing everything within LWUIT using layout managers, maybe its due to our Swing background and maybe its just our bad experience with the unique ways in which phones break when placing things absolutely.
A common request from users after LWUIT 1.0 was published was for a means of placing a component at an X/Y coordinate. We generally avoided that, since it doesn't make much sense. In that case why not just use Graphics, images etc.
We did however see two minor use cases for coordinate layouts, the ability to place elements in elaborate structures and the ability to place components one on top of the other (z-ordering). Notice that z-ordering can be achieved with other layout managers (in theory) but its not currently supported by any other layout.
Unlike an "absolute layout" that would just take X/Y coordinates and place a component within them, the coordinate layout "shifts coordinates" based on the amount of space it has available. E.g. in a 240x320 phone the size of the content pane might change for the following reasons:
- Different font size for the title/soft button areas.
- Signal/battery status on the top of the screen is shown by some operator firmwares even in game canvas!
- Rotation of the screen for newer devices
- Virtual keyboard opening on some devices
So you would need to constantly check and recalculate coordinates in order to make sure that they are correct if you were to use an "absolute layout". Coordinate layout does that check for you and lays out the components in the proper positions based on your intentions.
The following code produces the image you see above I will commit it to my incubator project soon:
mainForm.setLayout(new CoordinateLayout(200, 200));

Label centeredLabel = new Label("Center");
centeredLabel.setX(90);
centeredLabel.setY(90);
centeredLabel.getUnselectedStyle().setBgTransparency(100);
centeredLabel.getUnselectedStyle().setBgColor(0xff);

Label underCenter = new Label("Under Center");
underCenter.setX(80);
underCenter.setY(95);

Label top = new Label("Top Left");
top.setAlignment(Component.CENTER);
top.setX(0);
top.setY(0);
top.setPreferredW(200);
top.setPreferredH(30);
top.getUnselectedStyle().setBgColor(0xff0000);

mainForm.addComponent(underCenter);
mainForm.addComponent(centeredLabel);
mainForm.addComponent(top);

Notice several things:
- We create a coordinate layout in 200x200 rather than screen resolution, these are "virtual" coordinates and they would be adapted to actual coordinates when the layout occurs. We can now "assume" that our resolution will always be 200x200.
- Preferred size is used for all the components, we can determine absolute (unscaled size in pixels) using setPreferredSize
- Alignment etc. still works just as expected
- Z-order is determined by the order of addition to the container and is quite trivial using coordinate layout
Subscribe to:
Comments (Atom)